Arcade Control
The arcadeControl command block allows you to use the horizontal and vertical axis of one joystick to control your robot. Try it!

| The backward command makes the robot move backward instead of forward, using the exact same command details as the forward movement. |
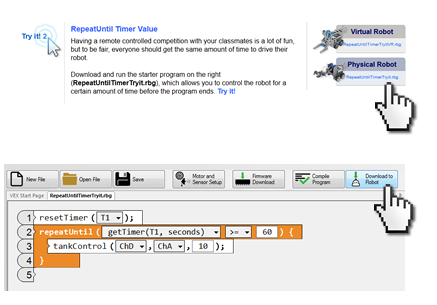
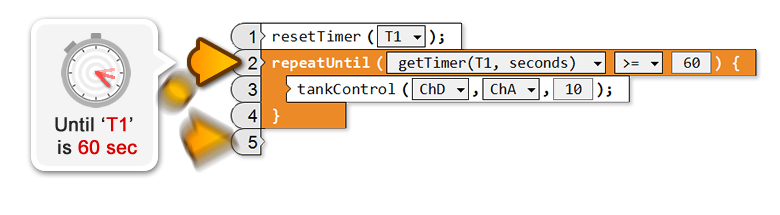
RepeatUntil Timer Value
Having a remote controlled competition with your classmates is a lot of fun, but to be fair, everyone should get the same amount of time to drive their robot.
Did you know?
Running Remote Control Programs|
Remote Control programs will appear under the "Auto Pgms"
section of the VEX IQ Brain. In order for you to run them, select "Auto Pgm" placed below "TeleOp Pgms". 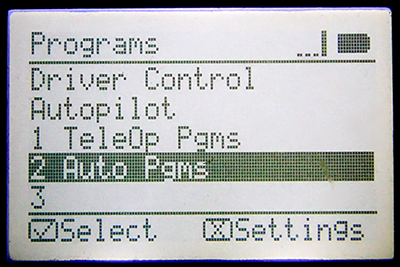
|
Did you know?
Joystick Sensitivity|
If you find that the joysticks are too sensitive when you are driving the robot, they can be adjusted with the setJoystickScale command block in ROBOTC. 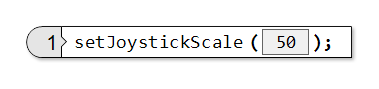
The setJoystickScale command block allows you to scale the position values that come out from the joysticks before they are applied to the driving motors. |
|
In this example:
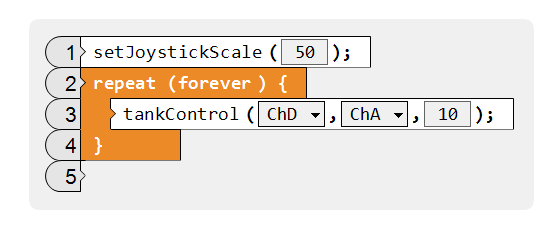 The setJoystickScale command block is placed once,
at the beginning of the program, and set to a value of 50.
The setJoystickScale command block is placed once,
at the beginning of the program, and set to a value of 50.
This changes the range of joystick position values applied to the motors from -100 and +100 to -50 and +50 for the entire program. When the joysticks are pushed fully forward, the motors will be driven at motor speed 50. When they are pushed fully down, the motors will be driven at motor speed -50. |
Did you know?
Drivetrains with More Than 2 Motors
 The tankControl and arcadeControl command blocks will allow you to
drive more complicated robots,
that have more than 2 driving motors,
if you configure your robot in the Motor and Sensor Setup.
The tankControl and arcadeControl command blocks will allow you to
drive more complicated robots,
that have more than 2 driving motors,
if you configure your robot in the Motor and Sensor Setup.
|
|
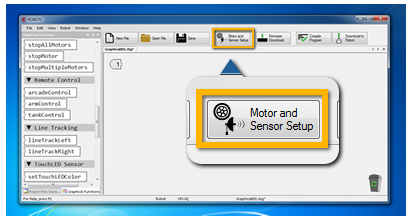 |
Open the Motor and Sensor Setup by clicking on the "Motors and Sensor Setup" button at the top of ROBOTC. |
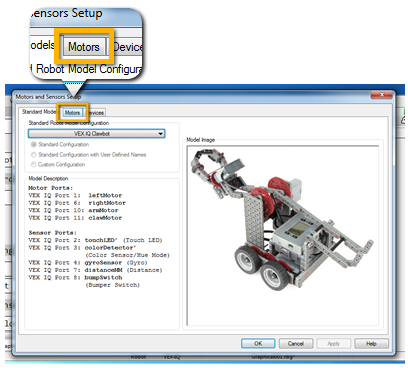 |
On Motors and Sensors Setup window, click and open the "Motors" tab |
|
On the Motors tab, configure where you have motors plugged in on the robot, and be sure to specify which "Drive Motor Side" the motors are on. Below is an example: 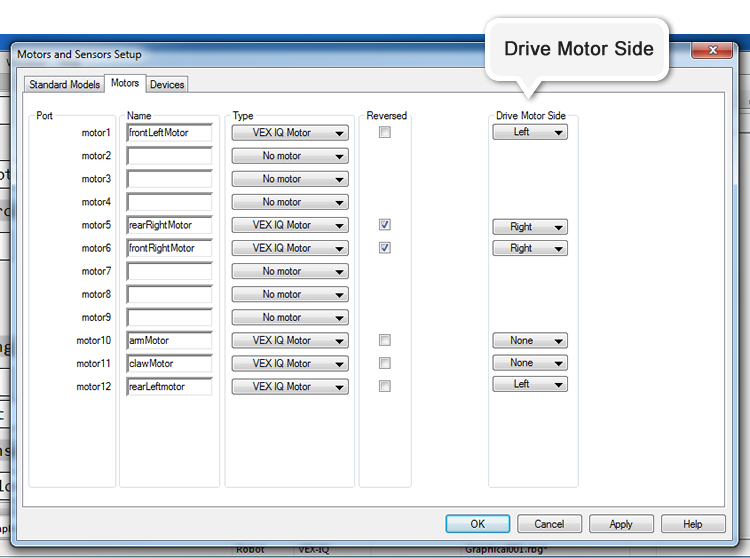
|
|
|
For a reminder on working with the Motor and Sensor Setup window, you can watch the Motor and Sensor Setup video in the Setup section of the curriculum. |
|